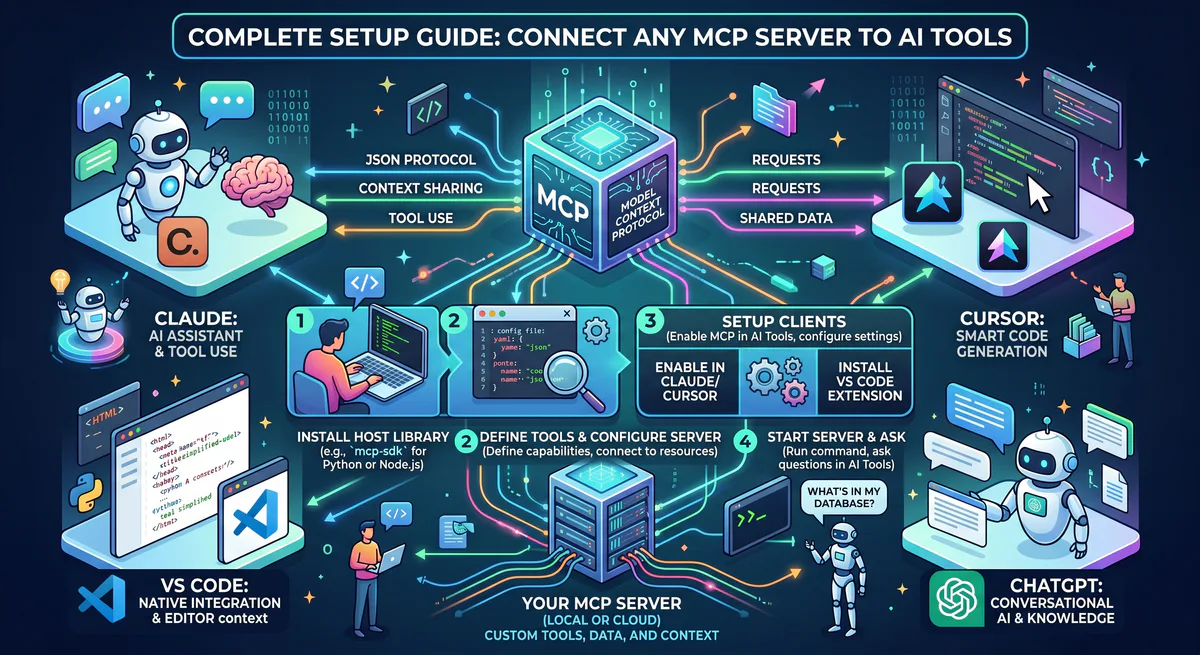
Exposing local resources or remote databases to your AI development environment transforms static LLM prompts into active, context-aware workflows. Once you subscribe to a server connector, establishing the bridge requires editing configuration files or using settings panels in your client interface.
This step-by-step tutorial walks you through setting up connections across all major AI desktop applications and code editors, ensuring credential security at every step.
Quick Start: The Universal Connection Process
Connecting any Model Context Protocol (MCP) server to an AI client follows a three-step configuration: subscribing to the server in the App Catalog, copying the generated connection URL, and pasting it into your client’s settings. The gateway securely manages your credentials, protecting raw API keys.
No matter which desktop editor or AI application you deploy, the integration lifecycle follows the same core path:
- Select and Subscribe: Choose the connector you need from the App Catalog.
- Retrieve Your Endpoint: Copy the connection URL generated by the platform.
- Configure the Client: Paste the URL into the appropriate client configuration block.
A typical secure connection string from our edge gateway looks like this:
https://edge.vinkius.com/mcp/your-server-id?token=your-secure-tokenUsing this proxy endpoint avoids exposing raw database credentials or private API keys directly to your local clients. The edge service processes the tool requests, authenticates them against your secure credentials vault, and passes the clean data payload back to the client.
Claude Desktop (Anthropic)
Connecting MCP servers to Claude Desktop requires editing the client’s configuration file. Developers open settings, click Edit Config to open the desktop configuration JSON, paste their server endpoint URLs under the mcpServers key, and restart the Claude application completely to initialize the new tools.
Step-by-Step Configuration
Follow these steps to connect your tools to Claude Desktop:
- Launch the Claude Desktop Application.
- Access Settings: Click your user profile in the bottom-left corner, navigate to Settings, select the Developer tab, and click Edit Config.
- Edit the Configuration: This opens the
claude_desktop_config.jsonfile in your default text editor. Populate it with your edge gateway endpoints:
{
  "mcpServers": {
    "notifier": {
      "url": "https://edge.vinkius.com/mcp/notifier?token=YOUR_TOKEN"
    },
    "repository": {
      "url": "https://edge.vinkius.com/mcp/repository?token=YOUR_TOKEN"
    }
  }
}- Save the File and exit the text editor.
- Restart Claude Desktop: Right-click the app tray icon and choose Quit, then open the program again. Simply closing the window will not reload settings.
- Verify Connection: Open a new chat. A hammer icon (??) should appear in the input box. Hover over it to see the list of active tools.
Configuration Locations by Operating System
If you prefer to open the configuration file directly, navigate to:
- macOS:
~/Library/Application Support/Claude/claude_desktop_config.json - Windows:
%APPDATA%\Claude\claude_desktop_config.json
Common Errors
| Issue | Root Cause | Resolution |
|---|---|---|
| Tool icon is missing | Client did not parse the config | Check the syntax at a JSON validator to verify commas and braces. |
| Stream connection failure | Client is offline or token is invalid | Test the gateway URL in your web browser to confirm the token is active. |
| Permission denied | Claude lacks system access | Check that Claude Desktop has permission to access the local path. |
Cursor IDE
Connecting MCP servers to Cursor IDE can be completed globally through features settings or locally on a per-project basis. Adding a cursor config JSON file in the project root defines tool scopes for your development team, allowing agents to access databases and execute code queries.
Method 1: Global Setup via Settings Panel
To make tools available across all workspaces in Cursor:
- Open Cursor and go to the settings pane by pressing
Cmd+,(macOS) orCtrl+,(Windows/Linux). - Go to Features in the sidebar, scroll down to the MCP section, and click Add New MCP Server.
- Fill in the server properties:
- Name: Choose a reference slug (e.g.,
notifier). - Type: Select
sse(Server-Sent Events). - URL: Paste your edge connection string:
https://edge.vinkius.com/mcp/notifier?token=YOUR_TOKEN
- Name: Choose a reference slug (e.g.,
- Click Save. The server status indicator should immediately turn green.
Method 2: Per-Project Local Setup
To bundle tools with a specific project repository so they are shared with team members:
- Create a folder named
.cursorin your project’s root directory. - Inside that directory, create a file named
mcp.json. - Add your server definitions:
{
  "mcpServers": {
    "repository": {
      "url": "https://edge.vinkius.com/mcp/repository?token=YOUR_TOKEN"
    },
    "debugger": {
      "url": "https://edge.vinkius.com/mcp/debugger?token=YOUR_TOKEN"
    }
  }
}- Important Security Tip: Add
.cursor/mcp.jsonto your.gitignorefile if it contains private tokens. If you wish to commit the configuration structure, replace the token query values with environment variable references.
VS Code (GitHub Copilot + MCP)
Connecting MCP servers to VS Code allows developers to expand GitHub Copilot capabilities. Using the command palette, developers choose the HTTP/SSE transport type, input their connection URL, and define a unique identifier, exposing custom tools directly inside the interactive coding workspace.
Setup Options
You can add servers through the interactive menu or write them directly to your workspace configuration.
Command Palette Integration
- Open VS Code and open the Command Palette (
Cmd+Shift+Pon macOS,Ctrl+Shift+Pon Windows/Linux). - Search for
MCP: Add Serverand press Enter. - Choose HTTP/SSE when prompted for the transport mechanism.
- Input your connection endpoint:
https://edge.vinkius.com/mcp/notifier?token=YOUR_TOKEN - Provide a reference name to register the integration.
Workspace Settings Integration
Alternatively, open your .vscode/settings.json file in the project workspace and add the following configuration block:
{
  "mcp.servers": {
    "notifier": {
      "url": "https://edge.vinkius.com/mcp/notifier?token=YOUR_TOKEN"
    }
  }
}
VS Code will automatically spin up the connection background processes. You can monitor logs in the output panel under the MCP client dropdown.
ChatGPT (OpenAI)
Connecting MCP servers to ChatGPT expands the model’s capabilities with real-time database queries. Within settings, users navigate to Connectors, select the Model Context Protocol option, and paste their secure endpoint URL, enabling the assistant to invoke tools dynamically during normal chat conversations.
Step-by-Step Configuration
To link your tools to ChatGPT:
- Go to the ChatGPT web dashboard or desktop application.
- Click your user profile avatar and select Settings.
- Under the Connectors tab, click Add Connector.
- Choose Model Context Protocol (MCP) from the available connector types.
- Paste your endpoint URL and authorize the connection.
- The interface will list the schema methods. In your conversation threads, you can instruct ChatGPT to execute queries using the connected server tools.
Windsurf (Codeium)
Connecting MCP servers to Windsurf provides developers with automated tools for AI-powered coding. By navigating to settings, clicking the add server option under the MCP panel, and entering the connection endpoint, the editor automatically discovers available tools to use in active development workspaces.
Step-by-Step Setup
Follow these instructions to link your servers to Windsurf:
- Open the Windsurf editor window.
- Go to Settings and click the MCP tab.
- Click the Add Server button in the list interface.
- Fill in the connection form with your name identifier and transport protocol (
SSE). - Input your token-protected edge endpoint.
- Windsurf will query the server schema and list active tools in the side sidebar panel.
Connecting Multiple Servers (Multi-Tool Recipes)
Connecting multiple MCP servers simultaneously enables complex workflows that span several databases and services. By defining separate server objects in your client configuration JSON, the AI model can automatically cross-reference data sources, query tables, and post alerts in a single conversation context.
Multi-Server Configuration JSON Example
For advanced developer toolchains, you can stack several tool servers in a single configuration file. Here is how to configure a multi-tool setup:
{
  "mcpServers": {
    "debugger": {
      "url": "https://edge.vinkius.com/mcp/debugger?token=TOKEN_1"
    },
    "monitor": {
      "url": "https://edge.vinkius.com/mcp/monitor?token=TOKEN_2"
    },
    "scheduler": {
      "url": "https://edge.vinkius.com/mcp/scheduler?token=TOKEN_3"
    },
    "repository": {
      "url": "https://edge.vinkius.com/mcp/repository?token=TOKEN_4"
    },
    "notifier": {
      "url": "https://edge.vinkius.com/mcp/notifier?token=TOKEN_5"
    }
  }
}
This arrangement allows the assistant to coordinate complex queries. You can issue single prompts that aggregate data from multiple tools, such as:
“There is an active alert. Look up the debug logs, check the deployment history from our repository tool, and notify the team channel with the details.”
The AI handles the sequencing, routing parameter outputs from the monitoring tools directly into the notification channels.
Enterprise Deployment Best Practices
Deploying MCP servers at an enterprise scale requires strict credential isolation and credential management strategies. Organizations should map server tokens to environment variables instead of committing plaintext keys to repositories, generate individual tokens per user for audit trails, and enforce read-only configurations.
Environment Isolation
Never commit security tokens in shared code repositories. If you commit configuration structures like mcp.json or .vscode/settings.json, reference system environment variables instead of pasting direct tokens:
- Setup local environment files (
.env):VINKIUS_NOTIFIER_TOKEN=your-token-here VINKIUS_REPOSITORY_TOKEN=your-token-here - Reference the variables in the configuration file:
{
  "mcpServers": {
    "notifier": {
      "url": "https://edge.vinkius.com/mcp/notifier?token=${VINKIUS_NOTIFIER_TOKEN}"
    }
  }
}
Operational Governance
- Token Auditing: Provision a separate access token for every engineer. This establishes a clean audit trail showing which employee or local client invoked specific database queries.
- Scope Restriction: Apply the principle of least privilege. Configure read-only tokens for general analysis tasks, elevating credentials to write permissions only when modifying code or production data.
- Regular Rotation: Rotate server tokens quarterly, and immediately revoke keys when a team member changes roles or leaves the organization.
Common Configurations by Role
Configuring MCP tools based on organizational roles aligns AI capabilities with specific business goals. Developers, marketers, sales representatives, and executive teams can combine databases, ticketing systems, calendar APIs, and communication adapters into unified toolchains that streamline domain-specific operations and automate administrative tasks.
Development Team Toolchain
Debugger + Repository + Ticketing + Notifier + DatabaseThis combination helps developers troubleshoot bugs, locate the source code file, create tasks, and query database records without leaving the chat interface.
Marketing Workflow Stack
Content Scraper + CRM + Search API + Notifier + Data SheetsAllows teams to track campaigns, analyze content performance, format tracking sheets, and send reports to communication channels.
Sales Operations Chain
CRM + Payment Gateway + Data Sheets + Notifier + Professional NetworkEnables sales representatives to monitor pipelines, verify client subscription details, update transaction records, and draft outreach messages.
Start Connecting Custom Integrations
Starting your first integration takes less than two minutes using the Vinkius edge platform. Pick your target application, subscribe to the server connector in the App Catalog, and copy your secure URLs into your desktop AI client or coding editor to begin automating tasks.
Connecting your primary tools requires only a few minutes. To set up your environment:
- Browse the App Catalog and select the applications you want to connect.
- Generate your endpoints by subscribing to the corresponding servers.
- Copy the connection URLs from your management dashboard.
- Paste the configurations into your chosen client (Claude Desktop, Cursor, VS Code, ChatGPT, or Windsurf).
Our gateway abstracts server infrastructure, giving you immediate access to remote endpoints with built-in credential protection.
Related Guides
This directory lists related guides in our MCP documentation ecosystem. We recommend exploring tutorials on OpenAPI-to-MCP wrappers, client connection configuration, architecture deep-dives, and enterprise security policies to further optimize your automated agent systems and secure your data integration pipelines across all business departments.
- Convert OpenAPI to MCP ? - Expose any standard REST API as tools.
- Architecture of MCP Servers ? - Deep-dive into protocol layers and primitives.
- MCP API Key Management ? - Secure authentication patterns.
- The MCP Server Directory ? - Discover integration connectors.
Analyze with AI
Send this article directly to your preferred AI to analyze concepts, extract actionable insights, or seamlessly integrate into your own projects.
Connect AI agents to your entire stack.
Browse ready-to-use MCP servers. Paste one URL to connect live databases, APIs, and business tools instantly.